Friday, December 13, 2013

Month Start Date in OBIEE 11g

We have the common need for Year Start Date, Month Start Date  and Week Start Date when we are working in OBIEE 11g. This is a basic need when we are working with measures like forecasting and lags.

The below are the codes which we can directly use to get the different dates from the date available.

For instance i'm taking the system date ........CURRENT_DATE


Year Start Date :

       TIMESTAMPADD(SQL_TSI_DAY,-       (DAYOFYEAR(CURRENT_DATE)-1),CURRENT_DATE)


Month Start Date :

      TIMESTAMPADD(SQL_TSI_DAY,-(DAYOFMONTH(CURRENT_DATE)-1),CURRENT_DATE)


Week Start Date :

     TIMESTAMPADD(SQL_TSI_DAY,-(DAYOFWEEK(CURRENT_DATE)-1),CURRENT_DATE)


Wednesday, December 11, 2013

Pop Up Message in OBIEE 11g

Popup is a general thing for us as we see a several popup messages coming when we are browsing over the net . This is a general way of advertising by not disturbing the base page. We can even say it as information window where it will display a window with a proper message.

Even we can use the same popup to show information on OBIEE dashboards. This might come handy if you want to display a general information about a dashboard page.

For instance lets consider a scenario of a Company having the Sales Dashboard for "Late Orders".

The Late Orders dashboard does not contain Internal Sales Orders of company and you want to display this information when a user comes to that Page. We can simply display it as a note ,but how many users will actually read it. There is always a chance that we miss to read NOTES.

But if we display it as a popup user will definitely read the message.

How to setup popup:

Add a text section to the dashboard. and write the below code in the text and save.


              <body onload="obi_popup()">
              <h1>Welcome to the world of BI</h1>
              </body>

Run the dashboard and you will see the popup.

Tuesday, November 12, 2013

Usage Tracking insert error in OBIEE 11g

we came across a very general error message when we took a look at the log file. This is something related to inserts. We are surprised why something related to inserts has been logged in OBIEE server log files where we only do the reads. Soon we realized that its related to usage tracking.

Error Message :

error inserting value into query_blob with below message

"ORA-01704: string literal too long"

Solution :

We tried many ways including deleting the column in both RPD and DATABASE but nothing helped. The solution we found is a patch from oracle to fix this bug.

BUG 12831483

Wednesday, October 23, 2013

Deploy RPD using Enterprise Manager in OBIEE 11g

This is the most common step while doing deployments. With Enterprise Manager coming into picture OBIEE has become more easier to handle. There are couple of ways of deploying RPD.

  1. Direct replace of RPD in repository folder
  2. Upload RPD using Enterprise Manager
We can follow both the ways but only based on the situation.Lets see an example to understand the same.

Consider we have a RPD named "OracleBIApps_001.rpd" and this needs to be uploaded to BI server.

Scenario1: The RPD that is currently loaded is also having the same name "OracleBIApps_001.rpd"

   This case we can follow the Method1 that is direct replace.Lets see the step of how to do it.
  •   Stop the BI services (see here to start and stop services)
  •   Go to the below folder
                 [ORACLE_HOME]\instances\instance1\bifoundation\OracleBIServerComponent\coreapplication_obis1\repository
  •  Replace the existing RPD file with new RPD file
  • Start the BI services
  • Open the RPD in online mode and verify the changes
 Scenario2: The RPD that is currently loaded is having name different to the new one.

This is the real time scenario that we face everyday in our day to day code migrations.Here we have 2 options of doing the migration
  1. Change the new RPD name as per the Existing RPD name and follow Method1.
  2. Keep the name and upload using EM.
Since we already knew how Method1 works lets now see the Method2.
  • Login to EM as weblogic
  • Navigate to below screen
                   Business Intelligence - Coreapplication - Deployment - Repository


  • Lock and Edit as shown below
  •  Upload the new RPD using "Browse" and click "Apply".
 We could even change the catalog location if you wish to.

  • "Activate Changes" and restart the server as shown below.
  • Open the RPD online to verify the changes.

  Note: Don't perform the above step by changing the RPD name directly in NQSCONFIG.INI as any changes to config files which are not done through EM will revert back to default values when we bounce the services.

Why do we need Alias tables in OBIEE....?


Alias tables are an important part of designing a Physical layer because they enable you to reuse an existing table more than once. 

An alias table is a physical table that references a different physical table as its source (called the original table).

There are several versions of advantages of Alias tables .Below are some noted points.

  1. Avoid circular joins.
  2. Reuse the same object more than once.
  3. Same table can act both as dimension and fact using aliases..
 lets see some examples for the same.

Example 1: 
Consider we have a two dates in a fact (Order_date and Ship_Date) and its has to be joined to Time dimension on both the keys.Since we cannot join both dates to a single key we create an Alias to Time dimension and join the Fact with two time dimensions one with Order_Date and the other with Sales_Order


Example 2:

Lets say we have a table Sales with following columns.

                        Order_Number,Item,Order_date,customer,Order_Qty

Since the same table is having dimensions and facts,we take an alias Sales_Fact & Sales_Dim and join on Order_Number.


Invalid JSON string:0 error while trying to run Dashboard Reports.

We have recently upgraded from 11.1.1.5 to 11.1.1.6.12 and here is an interesting issue that we have faced when we tried to access the Dashboards and Reports.

We received the below dialog box from the webpage.


There might be several reasons for this error as i read in many places the possible reasons in my scenario are
  1. The cache which is in my browser prior to upgrading is causing issue as it cannot find the related files with upgraded version.
  2. Analytics server might not be deployed correctly.
But the solution that worked is clearing the browser cache and restarting the browser and then trying to load the BI dashboards.


Tuesday, October 22, 2013

Starting and Stopping the BI services from command prompt in OBIEE 11g

OBIEE 11g has OPMN services which include BI server, Scheduler ,Presentation Services, Cluster and JavaHost. Lets see how we can manage them from command line using the oracle provided OS script file.


  • CTRL+R will open the run dialog box.
  • Type cmd and hit enter, it will open a command line with default path to user documents and settings.
  • Change the directory to where ever the OBIEE_HOME exists.
  • go to folder ORACLE_HOME/instances/instances1/bin
This folder contains the OS script file which can control the BI services.
  1. opmnctl  stopall - will stop all the BI services 
  2. opmnctl  startall - will start all the BI services
  3. opmnctl startproc ias-component=coreapplication_obips1 - to start the Presentation Server alone
  4. opmnctl stopproc ias-component=coreapplication_obips1 - to stop the Presentation Server alone
  5. opmnctl restartproc ias-component=coreapplication_obips1 - to restart the Presentation Server alone
we can control the other services alone by replacing the coreapplication_obips1 with respective names.


Enable Usage Tracking in OBIEE 11g

Usage Tracking is one of the finest features in OBIEE. This helps to get a lot of details which helps in database optimization, aggregation strategies, or billing users or departments based on the usage.

There are two ways of doing this.

  1. Through Enterprise Manager
  2. Directly changing the Usage Tracking section in NQSCONFIG.INI file.
Till Version 11.1.1.5 we have only one option of doing it and it is a direct configuration change. But in the later versions Oracle has provided a standard way of making these config changes to enable Usage Tracking.

Lets start with the process.The first step is to check the Connection Pool in RPD to confirm if it is pointed to the DEV_BIPLATFORM schema (RCU Schema).


There are two things that needs to be noted from here.
  • Connection Pool details


                  "[Database]"."[Connection Pool]"

                  e.g. "Oracle BI Usage Tracking". "Oracle BI Usage Tracking Connection Pool"


  • Path to the table S_NQ_ACCT

                 "[Database]". "[Catalog]"."[Schema]". "[Table]"


                  e.g. "Oracle BI Usage Tracking".""."BIPLATFORM"."S_NQ_ACCT"

refer to Create Usage Tracking tables and complete the step before we go for configuring the parameters.


  • Login to Enterprise Manager as Weblogic Administrator
  • Navigate to WebLogic Domain - bifoundation_domain - System MBean Browser

  • Navigate to oracle.biee.admin - Domain: bifoundation_domain  - BIDomain - BIDomain (the 2nd one listed)

  • On the right-hand side, go to the “Operations” tab and then click the “lock” option


  • Invoke the operation


  • Back in the “System MBean Browser” window pane, expand and select the following
oracle.biee.admin - Domain: bifoundation_domain - BIDomain.BIInstance.ServerConfiguration - BIDomain.BIInstance.ServerConfiguration and select Attributes in the right hand pane.


  • Click the “Apply” button at the top-right
  • Go back to BI Domain and on the right-hand side, go to the “Operations” tab and then click the “simpleCommit” option

  • Invoke the operation and restart the BI server using EM or using OPMNCTL commnd.
Click Here to download the PDF format of the steps for Enabling the Usage Tracking in OBIEE.


Create Usage Tracking Tables in OBIEE 11g

Oracle has provided the default scripts to create the TIME tables needed for Usage Tracking. These scripts comes along with the installation and are located on the server on which the BI server resides.

Path to Scripts

Middleware\instances\instance2\bifoundation\OracleBIServerComponent\coreapplication_obis1\sample\usagetracking\SQL_Server_Time

Oracle has provided files for different databases which includes Oracle,Teradata,SQL and DB 2. Considering Oracle as our database run the following scripts on the DEV_BIPLATFORM in order.

Scripts for an Oracle Database:
          Oracle_create_nQ_Calendar.sql
          Oracle _create_nQ_Clock.sql
          Oracle _nQ_Calendar.sql
          Oracle _nQ_Clock.sql

The first two scripts will each create a table (S_ETL_DAY and S_ETL_TIME_DAY) and then the final two scripts will perform a number of insert SQL statements to populate them.

Custom logo for Login and Home Page of OBIEE 11g

OBIEE is well known for its customization's and today we will see a simple but impressive one which is pretty easy as if we are replacing a file with the other.

Actually what i said in the above statement is true we will replace the default oracle logo with the customized logo.

First thing is to finalize your logo.The default oracle logo is less than 1KB and with dimensions 119x25. Make sure your logo has properties close to default logo so that it will not disturb the webpage alignment and loading time.Name it as oracle_logo.png.

OBIEE Login Page Logo Path 

middleware/user_projects/domains/bifoundation_domain/servers/bi_server1/tmp/_WL_user/analytics_11.1.1/7dezjl/war/res/sk_blafp/login

Home Page Logo Path

middleware/user_projects/domains/bifoundation_domain/servers/bi_server1/tmp/_WL_user/analytics_11.1.1/7dezjl/war/res/sk_blafp/b_mozilla_4


Replace the oracle_logo.png file in both the above places with the new customized logo.Once it is done clear the browser cache and restart the browser.Try opening the Analytics url you should see the new logo. If not restart the BI server and then try it. 

Maximum no of rows in Download in OBIEE 11g

The most common things we hear from client when we deliver a report is how can i download it as a Excel or PDF. It's an easy answer for any one to tell just export it.

Now lets see how to change the no of rows that are allowed in download. Generally the allowed limit is 2500 rows. This is a system administrator job and any one with Administrator role can do this.

  • Login to Enterprise Manager
  • Navigate to Business Intelligence - Coreapplication - Capacity Management - Performance 
  • Now to change the default values click on Lock and Edit Configuration
  • Change the "No Of Rows" under "Maximum Number of Rows to Download"

  • Once you are done with changes click on "Activate Changes"
  • To get the changes effective Restart All the BI services.

We can also change the no of rows displayed, Session expire minutes, Global Cache ,Cache Management etc .. in the same way as above.


SMTP(Mail) Configuration in OBIEE 11g

As we all know OBIEE is well known for its iBots which we now call delivers in 11g. Let's see how we can configure the email configuration settings in OBIEE 11g.

First thing that we need to know for this setup is the user who ever is doing has to be having the Administrator privilege in OBIEE.

Let me make it simple and clear, all we need is SMTP details (working of course) and access to configure them.

Login to Enterprise manager

  •  EM url :        http://[Hostname]:[7001]/em

  • Navigate to Business Intelligence - Coreapplication
  • Now navigate to Deployment - Mail
  • Click on Lock and Edit Configuration
  • Now enter the SMTP details as shown below

  • Click on Activate Changes
  • Restart the BI services as shown below.


That's it you are done. The only thing left is testing. Create and agent in answers with some recipients and run it.

Monday, October 21, 2013

Explorer.exe window pop up every time at Windows 8 start up

Every time we open the computer and go to the Desktop I encounter an alert Explorer.EXE  dialogue box that shows nothing but a blank alert dialogue box with the warning icon.


There are two things we need to do to eliminate this error.

Step 1: Clear the %TEMP% folder.
  • click CTRL+R and type %TEMP% and hit enter
  • A window will open, clear all the items in the folder.
Step 2: Open Registry Editor and navigate to the below path.
  • click CTRL+R and type "regedit" and hit enter ,it will open Registry Editor.
  • HKEY_CURRENT_USER  - Software - Microsoft - Windows NT - Current Version - Windows
  • Now you will find a entry with name "Load" and some path as value.Delete this value.
Now restart the computer and you will not find the dialog box  again.

WiFi connectivity Problem when updated to Windows 8.1

With the latest version of Windows (8.1) coming into picture and available for every one for updating for free we just do it without thinking of what will happen. The same happened with me too and the problem that i faced is most serious one.

WiFi connectivity issue right after the update is successful.I tried for around 4 hours and at last found the temporary solution (because no one announced it official) , but its working fine for me.

Just follow my instructions ,its just a 2min job and easy.

1) Right click on my computer and go to "Properties".
2) Click on Device Manger on the left pane.
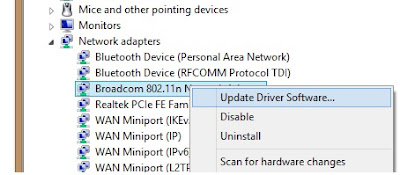
3) Go to "Network Adapters" and select the wireless driver and right click on the driver and click "Update Driver Software"


4)  Click on "Browser my computer for driver software" and the "Let me pick from list of drivers available on my computer"
5) Uncheck the "Show Compatible Software" as below.


6) Select "Broadcom" as manufacturer and in the right window select the last driver named as "Broadcom 802.11n Network Adapter (Microsoft)" and finish.

There are two drivers named as the above, select the last one from top with this name. To verify check the driver version 5.100.245.200 and dated as 14-03-2012.

That's it you can find the internet already connected if not restart the computer.


Wednesday, August 21, 2013

FILTER function to improve performance of OBIEE reports

OBIEE allows developers to write expressions at several places like BMM,prompts, column expression builder etc. And most of the time we end up in writing CASE statements to achieve some or the other logic.
As we all know CASE statements actually are so popular in causing query performance issues.

Let us know discuss on how these CASE statements can be avoided and use FILTER function to achieve the desired logic.

Where to find

In the Column Expression Builder - Functions -- Display Functions -- Filter

Lets see how we can make use of this with an example

How to Use

Consider the below logical expression using CASE statement

CASE WHEN 
Paint.Markets.Country= ‘INDIA’ 
THEN 
Paint. SalesFacts. Quantity 
ELSE 
END

Now lets see how we can use the FILTER function to achieve the same

FILTER (Paint. SalesFacts. Quantity  USING(Paint.Markets.Country= ‘INDIA’ ))


Analyze the physical SQL for understanding the Query performance

What ever we do in Presentation, how best we may design the RPD,how good we may have set the performance metric parameters ,the ultimate thing that counts is the Physical SQL that hits the database.

Lets see the physical SQL generated by these both functions for above examples

The SQL generated from the CASE statement looks something like this:

SELECT Year,
SUM(CASE WHEN 
Country= ‘INDIA’  THEN Sales ELSE 0)
FROM 
PHY_TABLE
GROUP BY year


Lets see the SQL generated by FILTER function 

SELECT Year,
SUM(
Sales)
FROM PHY_TABLE
WHERE Country= ‘INDIA’ 
GROUP BY year

When we observe the above two physical statements one can easily understand that SQL generated by FILTER is more effective when compared to CASE statements since it uses the conditions in WHERE clause.This is why we have to start using the FILTER where ever we can to avoid the CASE statements

Tuesday, August 20, 2013

OBIEE - Purge BI Server Cache

Oracle BI is most powerful and user friendly Business Analytics tool.This is because its simple to use and generates high data reports in quite a less amount of time (less than a sec for some cases).One of the reasons for such performance is because of the Cache feature in the tool.

When a query is run by one user it can be saved as a file to cache; if another user queries for the same information, rather than wait for the information to be fetched from the database it can be queried or retrieved  from the cache for a better performance.

There are some problems when we are using Cache, one among them is existence of stale data.So purging is one among the admin activities that needs to be carried when we use cache feature.

Ways to Purging BI Server Cache

There are three ways of doing it
  1. via the Presentation Services 
  2. using the Administration Tool
  3. with an OS (Operating System) level command

Purging the Cache via the Presentation Service

Select Settings, Administration; the Administration Window will open
Select to Issue SQL; this window will allow you to issue SQL Directly
In the command window enter the text below and click to Issue SQL
          Call SAPurgeAllCache()

Using the Administration Tool

Administration tool is client tool for OBIEE from which we can access the BI server components like RPD,Cache,Security etc. 

Open Admin Tool
Open RPD in Online Mode
Go to Manage --> Cache

You can now see the cache entries in the window. Select the cache entry you want to purge and right click and purge cache.

With an OS (Operating System) level command

We can also use the nqcmd executable to issue the same command, taking advantage of ODBC extensions functions.

Login to the hosting machine and navigate to the Server Bin directory

Linux Command Shell
$ cd /OracleBI/server/Bin$

Use an editor such as vi to create a file containing the command you want to issue. The first window shows the command to open the text editor, the next is the contents of the file.

     Linux Command Shell
    $ vi purge.txt$


    purge.txt
    Call SAPurgeAllCache()

Follow the instructions listed below to issue the purge command(s)

    Linux Command Shell
    $ cd /OracleBI/server/Bin$ nqcmd -d “AnalyticsWeb” –u Administrator –p Password –s purge.txt$

In this example –d is used to identify the datasource, -u username, -p password and –s sql input file
The advantage of the latter approach is that the executable can be scripted to occur at regular intervals.

Some of the default commands provided by Oracle are below

Call SAPurgeAllCache( );
Call SAPurgeCacheByTable( );
Call SAPurgeCacheByQuery( );


Best Practices for Designing Business Model Mapping Layer for Oracle BI

OBIEE BMM Layer Design Principles / Best Practices

There are some design principles(geeks call them best practices) suggested by oracle in designing the OBIEE repository. we can find these in if open any standard/sample repository provided by oracle.

Below are some design principles for BMM Layer.

1. Multi User Development Environment (MUD)


Use the Multi- User Development  facility if there are multiple developers. Multiple developers to connect “online” to the same repository file and making changes is not recommended.

Multi User Development allows user to define a series of projects within the repository file ,where each project is a subset of the entire repository .If developers want to make changes , they can check out a project to a local machine make and test the changes,and then check the modifications back into the master repository file.

2.  Always run Global Consistency Check before releasing a repository.

Whenever we make changes to a repository ,always be sure to run Global consistency check. It is bad practice to release a repository that still contains consistency check errors. In some cases, consistency errors prevent Oracle BI Server from loading the repository. Use the Consistency check manager to identify and debug check messages.

3.Separate Business Model

Even if you have only a single data source or schema in the physical layer, or you have only one physical data source for the repository, it is still good practice to break out the physical objects into multiple business models in the BMM layer to represent the independent areas of functionality.

4. Logical Tables

When building logical tables, do not merge multiple dimension tables into a single logical dimension table,and do not merge multiple fact tables into a single logical fact table.

Having multiple logical fact tables also makes it easier to create well defined projects for Multi User development.It is also a good practice to prefix logical table names with either Dim-, Fact- ,or Fact Compound .

This allows you to easily see how the tables are being used. It also groups the tables in the business model, so that facts are groups with facts, dimensions with dimensions  and so on.

5. Time Dimension

There are few things to keep in mind in time dimension factor.

Always must ensure that time Dimension hierarchy is built correctly and the logical level of each time- logical table source is set correctly
If there are multiple time dimensions within the business model, for consistency, make sure that all time dimension logical table contains the same columns and general structure. This is good for reporting purpose.

6. Logical Fact & Dimension table columns

Always assign a primary key for logical dimension tables. All logical dimension columns should be renamed in a way that is meaningful to users.
Bring only required columns in to the BMM layer for reporting.
Do not assign logical primary key for logical fact tables.
Create meaningful name for measures
Set aggregation rule for every logical fact columns.
Create “dummy” measures to group facts.

7. Logical Joins

Use only logical(complex ) joins in BMM layer. And always accept default properties when creating joins.

8. Calculated Measure

When building calculated measures try to be a bit cautious.

Use logical columns for calculations that require an aggregation rule that is applied before the calculation.
Use physical columns for calculations that require an aggregation rule to be applied after the calculation.

9. Aggregates

Few important things to keep in mind about Aggregates.

Try to ensure that each aggregate table has an effective summary ration with underlying detail.
Ensure that the logical level of every aggregate logical table source is set correctly.
Always test to ensure that aggregates tables are being used as expected.
If an aggregates is not used ,try changing the number of elements on one of the related logical dimension levels.

10. Dimension Hierarchies

In Dimension Hierarchies few things  are very important to keep in mind

It is best practice to create dimensional hierarchy for every logical dimension table in BMM layer.
All Dimension must have at least two levels : the total level and detail level.
If you are creating Dimensional Hierarchy manually, be sure to check Grand total level for the Total Level.
Use Update Row Counts or Estimate Levels to set the number of elements for every level of every Dimension Hierarchy.
Think about the experience of user when enabling drill down.

11. Avoid Snowflake schema

When there is Snowflaking in physical model,We should try to avoid Snowflaking in BMM layer and build models that use only star schema .

Use WHERE clause filters to help avoid using opaque views or complex joins in the physical layer.

Sunday, August 18, 2013

Calendar Date/Time Functions for OBIEE

The calendar date/time functions manipulate data of the data types DATE and DATETIME based on a calendar year. You must select these functions together with another column; they cannot be selected alone.


Current_Date

Returns the current date. The date is determined by the system in which the Oracle BI Server is running.

Syntax    Current_Date

Current_Time

Returns the server current time. The time is determined by the system in which the Oracle BI Server is running.

Note: The Analytic Server does not cache queries that contain this function.

Syntax   Current_Time(integer)

Current_TimeStamp

Returns the current date/timestamp. The timestamp is determined by the system in which the Oracle BI Server is running.

Syntax  Current_TimeStamp(integer)

Day_of_Quarter

Returns a number (between 1 and 92) corresponding to the day of the quarter for the specified date.

Syntax  Day_Of_Quarter(dateExpr)

DayName

Returns the name of the day for a specified date.

Syntax  DayName(dateExpr)

DayOfMonth

Returns the number corresponding to the day of the month for a specified date.

Syntax  DayOfMonth(dateExpr)

DayOfWeek

Returns a number between 1 and 7 corresponding to the day of the week, Sunday through Saturday, for a specified date.

For example, the number 1 corresponds to Sunday and the number 7 corresponds to Saturday.

Syntax  DayOfWeek(dateExpr)

DayOfYear

Returns the number (between 1 and 366) corresponding to the day of the year for a specified date.

Syntax  DayOfYear(dateExpr)


Hour

Returns the number (between 0 and 23) corresponding to the hour for a specified time.
For example, 0 corresponds to 12 A.M. and 23 corresponds to 11 P.M.

Syntax  Hour(timeExpr)

Minute

Returns the number (between 0 and 59) corresponding to the minute for a specified time.

Syntax  Minute(timeExpr)

Month

Returns a number (between 1 and 12) corresponding to the month for a specified date.

Syntax  Month(dateExpr)

Month_Of_Quarter

Returns the number (between 1 and 3) corresponding to the month in the quarter for a specified date.

Syntax  Month_Of_Quarter(dateExpr)

MonthName

Returns the name of the month for a specified date.

Syntax  MonthName(dateExpr)

Friday, August 2, 2013

Export or Import Oracle Database

To Import

Open Command Prompt
> imp USERNAME/PASSWORD@SERVICENAME file='path' FULL='Y'

Example: imp scott/tiger@orcl file='D:\sales.dmp' full='Y'


To Export
Open Command Prompt
> exp USERNAME/PASSWORD@SERVICENAME file='path' FULL='Y'

Example: exp scott/tiger@orcl file='D:\sales.dmp' full='Y'

Supplier Dump File free Download

Oracle Supplier2 Schema .dmp file free download

To Download form Ziddu  Click Here
To Download from MediaFire Click Here

Quota.xls file for practicing activity guide

To Download Click Here


Follow the post to know how to import them to a DB scheme.


Monday, March 4, 2013

Generate SQL insert/update statements from Excel

Excel is a very helpful tool when you are trying to copy data between to non compatible environments.Once such situation is having data in a excel file and want to import it to a data base table.its very easy to generate insert/update commands in excel which can be directly executed in the console.

We have two options for import

1) Direct import option in SQL Developer

select the table in the left panel of the SQL developer,right click ,import.

This helps us a lot when data is in exact format of the table.how ever when we have data in pivots and complex formats this will not help.For such cases we have option 2.

2) Generate INSERT/UPDATE statements 

I will give you a simple example, the logic can be applied to any complex statements.

Lets consider below data ,which has to be inserted into a STUDENT TABLE (ROLL NO.NAME,BRANCH)


Now select a cell next to last column of the first row and write the below statement in it

="INSERT INTO STUDENT ("&B2 &",'"&C2 &"','"&D2 &"')"

Apply the same formula for all the rows by just dragging the cell.

You can see the result as below


This is simple and the logic applies for all complex queries.

Wednesday, January 23, 2013

Cognizant Drive for Freshers on 2nd Feb 2013 in Bangalore

Cognizant is conducting drive for freshers in Bangalore in Manyatha Embassy Park,Outer Ring Road through Niteo IT Solutions. You have to get registered to get the Hall Ticket. No Registration Fee will be collected for registering with the consultancy.


Eligibility:
=========
BE/B.TECH,MCA,ME/M.TECH
60% throughout the academics
only 2012 pass outs are considered
Get hall ticket from the below address before 29-Jan-2013.


Address:
=======
Niteo IT Solutions
Indo Asian Academy,
Kalyan Nagar Bus Depot
Outer Ring Road
Bangalore
Contact Number : +91 9980834792